Gypsum board. also called as plasterboard and drywall, can be used to partition any interior and are prefered choise of construction for a range of applications, in homes, hotels, hospitals, schools, theatres and industry. they are strong and robust(drywalls of up to 15 metres high have been built). and can typically last the lifttime of a building uless they are subjected to abuse or alteration.
Specification
| THICKNESS (mm) |
WIDTH (mm) |
LENGTH (mm) |
WEIGHT (kg/m2) |
| 9.5 |
1200/1220 |
2400/2440 |
7.2 |
| 12 |
1200/1220 |
2400/2440 |
9.0 |
| 15 |
1200/1220 |
2400/2440 |
11.5 |
| 9.5 |
1200/1220 |
2700 |
7.2 |
| 12 |
1200/1220 |
2700 |
9.0 |
| 15 |
1200/1220 |
2700 |
11.5 |
| 9.5 |
1200/1220 |
3000 |
7.2 |
| 12 |
1200/1220 |
3000 |
9.0 |
| 15 |
1200/1220 |
3000 |
11.5 |
Storage and Handling
- Gypsum board does not generate or support the growth of mold when it is properly transported, stored, handled, installed, and maintained. However, mold spores are present everywhere and when conditions are favorable; mold can grow on practically any surface.
- GYPSUM BOARD MUST BE KEPT DRY to prevent the growth of mold.
- Gypsum board must be stored in an area that protects it from adverse weather conditions, condensation, and other forms of moisture. Job site conditions that can expose gypsum board to water or moisture must be avoided.
- Gypsum board must be protected during transit with a weather-tight cover in good condition. Plastic shipping bags are intended to provide protection during transit only and must be promptly removed upon arrival of the load. Failure to remove the shipping bag can increase the likelihood of developing conditions favorable to the growth of mold.
- Gypsum board that has visible mold growth must not be used.
- Gypsum board must be stored off the ground and under protective cover. Sufficient risers must be used to assure support for the entire length of the wallboard to prevent sagging.
- Gypsum board must be delivered to the job site as near to the time it will be used as possible. Individuals delivering gypsum board to jobsites should ensure that it is carried, not dragged, to place of storage/installation to prevent damage to finished edges.
- Gypsum board shall always be stacked flat - NEVER on edge or end. Gypsum board stacked on edge or end is unstable and presents a serious hazard should it accidentally topple. Gypsum board should be placed so weight is evenly distributed and the floor is not overloaded.
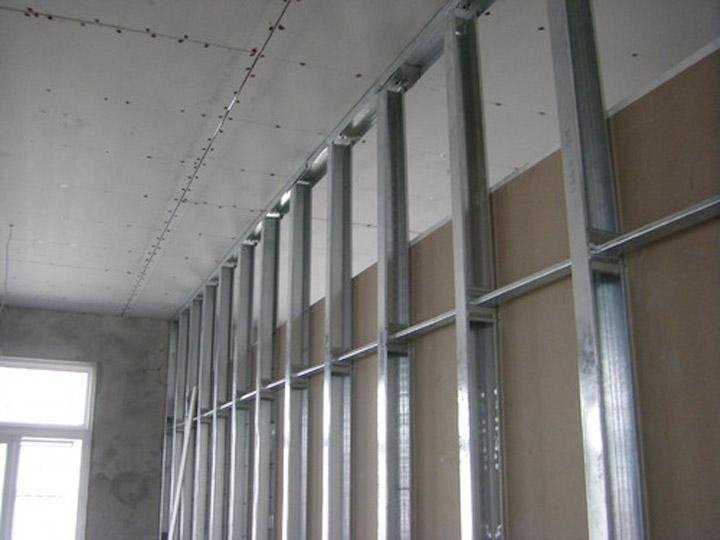
Galvanized steel profiles: studs, tracks, channels and angles are used for wall partition.
steel studs and track systems offer practical and economical solutions for screwfixing plasterboard to internal non-load bearing partitions, fire and acoustic rated walls, stairwells, bulkheads and corridor ceilings
Partitioning System is suitable for use in commercial and domestic buildings where it is necessary to provide strong non-load-bearing partitions. There is a wide range of partition thickness available for heights of up to 12m. The system is economical and can be erected easily. When installing the system, it is advisable to use and electrically or battery-operated screw gun. It is necessary to ensure that electric cables can pass through the studs that are protected by grommets
Benefits
- The metal system is accurate and solid, and will not move over time or with changes in temperature.
- There is a wide range of stud widths from 50mm to 146mm to meet varying requirements.
- It is a fast and clean system to erect that allows services to pass through easily.
- All sections fit together easily and door frames are formed very simply.
Sectors
- Residential
- Healthcare education
- Student accommodation
- Hotels
- Education
- Commercial
- Retail
Specifications
- Thickness: 0.3mm-1.2mm
- Surface: Galvanized zinc coating is 40-300g/m2
- Technology: adopting high grade qualtiy hot-dipped galvanized steel. the products surface zero spangle and intensity toughness, besides, it can add 20 more than common product
- Packing: loose bundle packing each 8pcs or 10pcs, 12pcs, 20pcs, etc,
METAL STUDS AND TRACK AND CHANNELS FOR GYPSUM BOARDS WALL PARTITON SYSTEM.
Specification for Asia:
| Main Channel |
38x12 |
| Furring Channel |
68x35x22 |
| Wall angle |
25x25 |
| C stud |
50x35 |
| C Stud |
70x35 |
| C stud |
75x35 |
| U track |
52x25 |
| U track |
72x25 |
| U track |
75x25 |
Specification to Australia:
| top cross rail |
25x21x0.75 |
| 25x21x0.75 |
|
| Furring Channel |
28x38x0.55 |
| 16x38x0.55 |
|
| Furring Channel track |
28x20x30x0.55 |
| 16x20x30x0.55 |
|
| Stud |
64x33.5x35.5 |
| 76x33.5x35.5x0.55 |
|
| Stud |
92x33.5x35.5x0.55 |
| 150x33.5x35.5x0.55 |
|
| Track |
51x32x32x0.55 |
| 64x32x32x0.55 |
|
| 76x32x32x0.55 |
|
| Track |
92x32x32x0.55 |
Specification to Europe, Russia; Ukraine;Georgia. etc.
| C Stud |
60x27 |
| U track |
28x27 |
| C stud |
50x50 |
| C stud |
75x50 |
| C stud |
100x50 |
| U track |
50x40 |
| U track |
75x40 |
| U track |
100x40 |

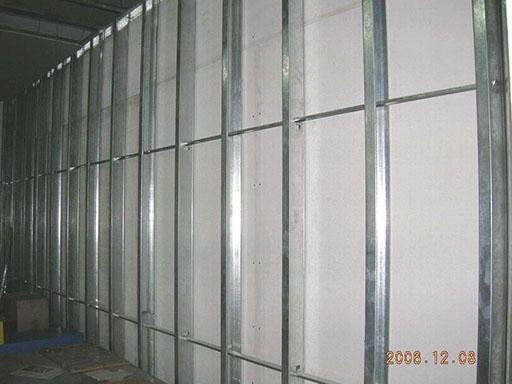
Wall partition

Wall partition system
Support channel
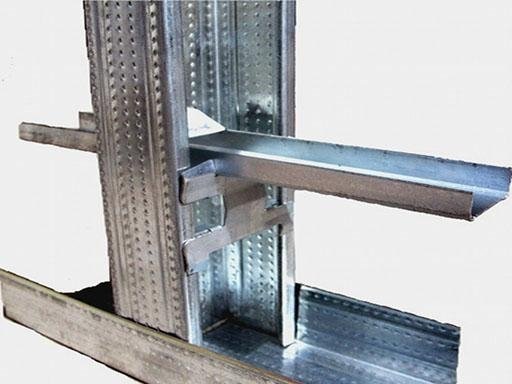
Wall partition support system
Wall partition
Studs, track with support channel

Working With Steel Studs writen by Harrison Kral
How would you like to be able to frame a perfectly straight wall each and every time? Using studs that won’t split or crack, and so light that you could carry 20 of them at once? If this sounds good to you, consider using steel studs for your next project. When you add in steel’s other benefits — it won’t burn or rot or get eaten by insects — we’re confident that these tips from our pro will make you think about steel.
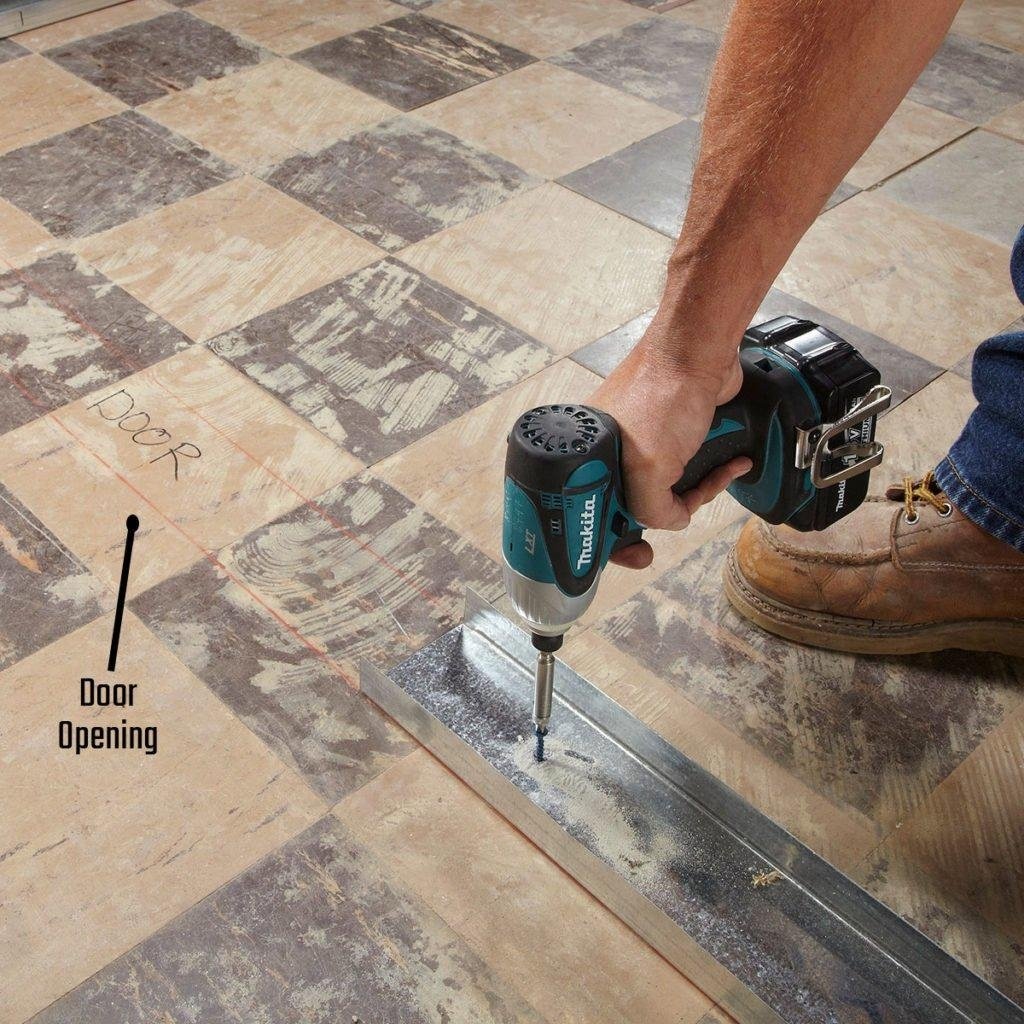
Don’t lay track over a door opening
There are two basic steel framing components: studs and tracks. The track functions as the top and bottom plates. Lay out your walls and openings just like you would with wood, but when you install the bottom plate, don’t run the track across the door openings. You can’t use your recip saw to cut the opening out later, as you can with wood. Concrete screws (Tapcon is one brand) work well to attach the track to concrete.

To cut, snip both sides, then score
Most home centers sell circular and chop saw blades designed for cutting studs, but Joe prefers a quieter and less messy approach. He cuts both sides with snips and scores a line on the back. After bending the stud back and forth a few times, he ends up with a burr-free cut. No need for hearing protection and no metal shavings sticking to your boots. Caution: Steel studs and tracks are sharp. Joe is a pro—you should wear gloves.

Use a stud to locate the top plate
Unlike wood, steel studs are reliably straight. Cut one stud to size and use that, along with a level, to mark the location of the top plate at both ends, and snap a line to guide placement. Don’t worry about cutting your studs to fit perfectly. It’s completely unnecessary. This is a great advantage if you’re working on an uneven floor. You can cut steel studs about 1/4 in. shorter than the actual measurement.

Protect your cords and yourself
Accidentally stepping on an extension cord that’s draped over a sharp track is a perfect way to cut your cord. To avoid potentially shocking developments, Joe takes a scrap chunk of track, flips it upside down and puts it under the cord.

Use the track for blocking
Top plates that run parallel to joists often need to be fastened to braces. You could use wood, but Joe prefers to use scrap pieces of track instead. Just cut the sides of the track and fold them out. Then fasten the track to the underside of the joist with drywall screws.

Cut a kerf in the blocking
Like doors, cabinets and other heavy objects need extra support. You can use plywood or 2x4s, but make sure you cut a kerf in it to accept the lip on the inside of the stud. If you don’t, that lip of the stud will press against the support board and twist the stud, creating a bow in the wall.

Lay out studs from the back of inside corners
Drywall is hung a little differently on steel framing. Drywall sheets don’t butt up to each other at inside corners. One of the sheets will be slid all the way to the back of an inside corner (see “Leave the Last Stud Loose at Inside Corners” on p. 113). So, when you lay out the stud locations, slide your tape measure all the way to the back of the track. Joe clamps his tape into place with a spring clamp. He clamps it several inches away from the end to avoid damaging the tang (steel tab).

Build up the bottom plate
Base trim can still be installed with trim screws. If you don’t like the look of the screw heads, you can install two layers of 2×4 plates instead of steel track. With 3 in. of wood under the track, you’ll be able to nail all the base trim just as you would a wood-framed wall. Over concrete, make sure you use treated wood for the bottom plate.
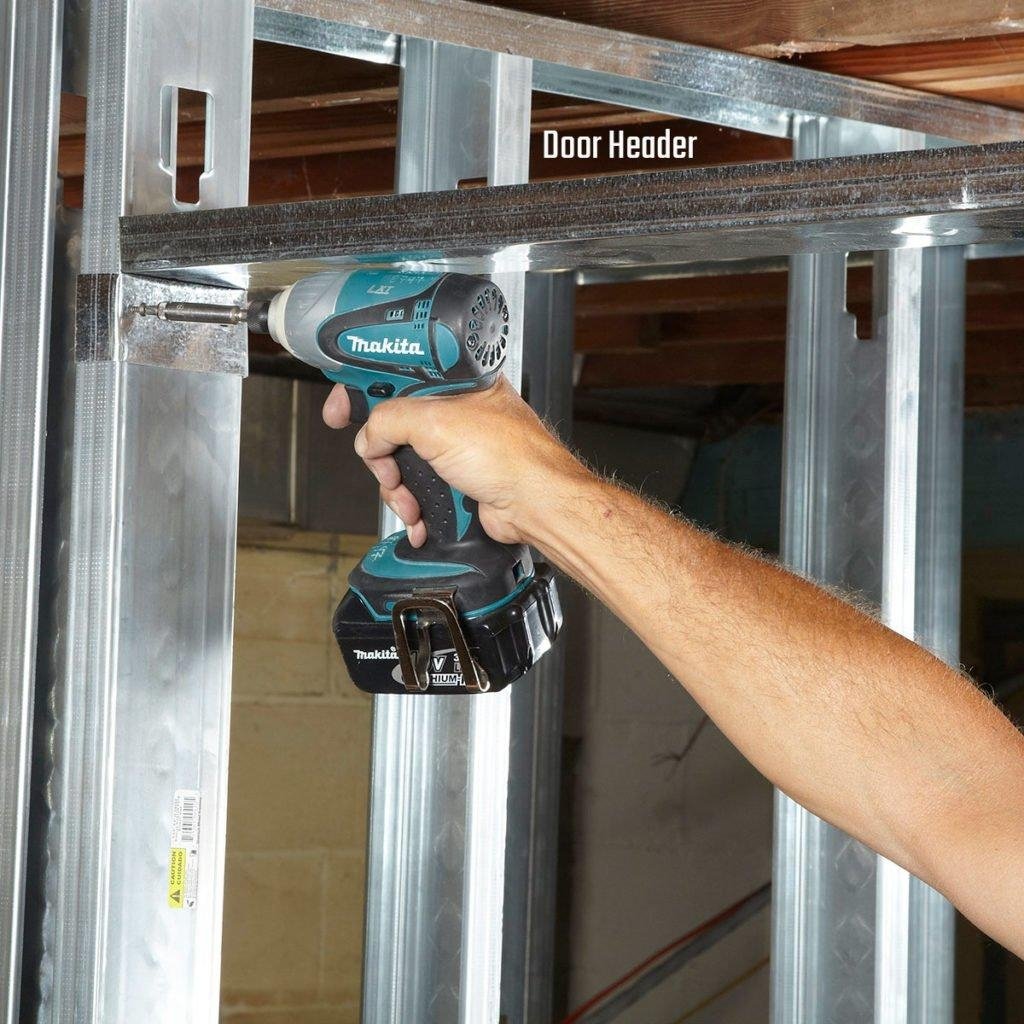
Install track as a header
Use a section of track as a header on those interior openings that aren’t load bearing. Cut the track 3 or 4 in. wider than the opening, cut the sides and use a rafter square as a guide to bend them back. Have the open side of the track face up so you can slide in the cripple studs if you need them.

Use wood bucks to hang a door
It’s a hassle to hang a door directly onto steel studs. Instead, frame the openings 3 in. wider and 1-1/2 in. higher and use drywall screws to fasten 2×4 bucks on the inside of the steel opening, then hang your door from the wood bucks. The bucks are also there for nailing on the casing. Slide a plastic shim under each side 2×4 if the wood is going to be in direct contact with a concrete floor.
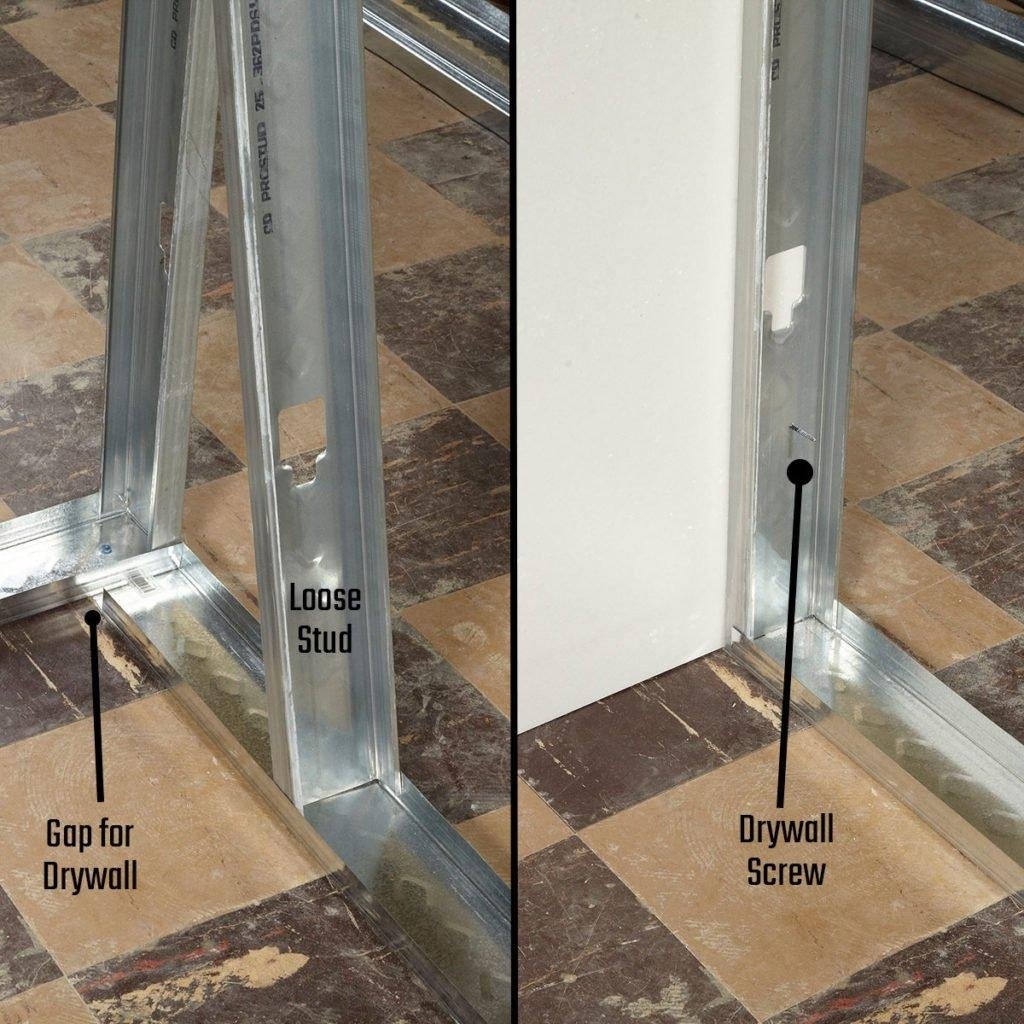
Leave the last stud loose at inside corners
The proper way to drywall an inside corner is to slide the first sheet all the way into the inside corner and then fasten the last stud on the wall adjacent to the drywall. To do this, you’ll need to leave that last stud loose until the drywall goes up. This method may seem a little goofy, but it requires fewer studs, and it results in an extremely stable joint. When laying out the tracks, make sure you leave a gap for the drywall to slide in.
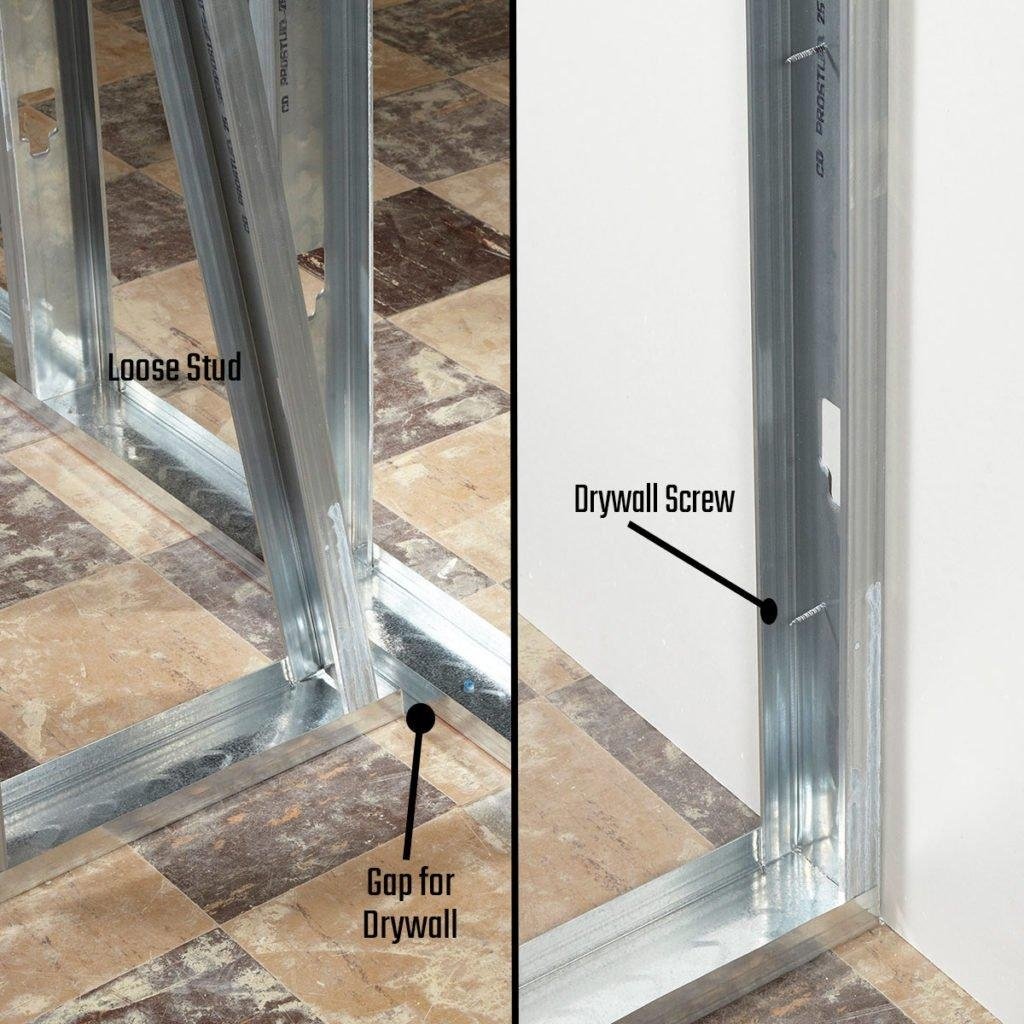
Leave the last stud loose at ‘T’ intersections too
Similar to handling inside corners, leave the last stud loose on the wall that makes up the stem of a “T” intersection. After the drywall is hung, that last stud on the intersecting wall will be fastened to the drywall. Once again, this method requires fewer studs and results in a rock-solid joint that’s almost guaranteed not to crack the drywall mud. Leave the top and bottom tracks short to allow room for the drywall to slide behind.